
Inside Our Cabin Power System: A Complete Look at Our Off-Grid Solar and Battery Bank
Why We Built Our Own Cabin Power System
When we first started living on the property, we ran everything off a small Jackery unit and a single folding solar panel. It got us through our first year of boondocking, but it wasn’t sustainable—especially once we switched to Starlink for internet. As our homestead projects ramped up, so did our power needs. We wanted something that could reliably power a laptop, a 29” ultra-wide monitor, internet, LED lights, and seasonal essentials like fans and bug zappers—all without having to run the 1800w Firman Generator just to keep things going.
We decided to build our own 12V solar power system, using components that could be sourced affordably and assembled in stages. We didn’t want to rely on prefab kits. I wanted to understand every wire, every fuse, and every setting. What I’ve built is a 400Ah AGM battery bank powered by four Renogy 100W panels, charging through an MPPT controller, with AC charging from a Honda 3000W generator and Victron Blue Smart AC to DC charger and full monitoring via Victron’s SmartShunt.
System Overview
This system is designed to be simple, rugged, and easy to maintain. It provides stable power for our off-grid cabin and supports light daily use—even during Michigan’s shorter winter days. Here's a look at the major components:
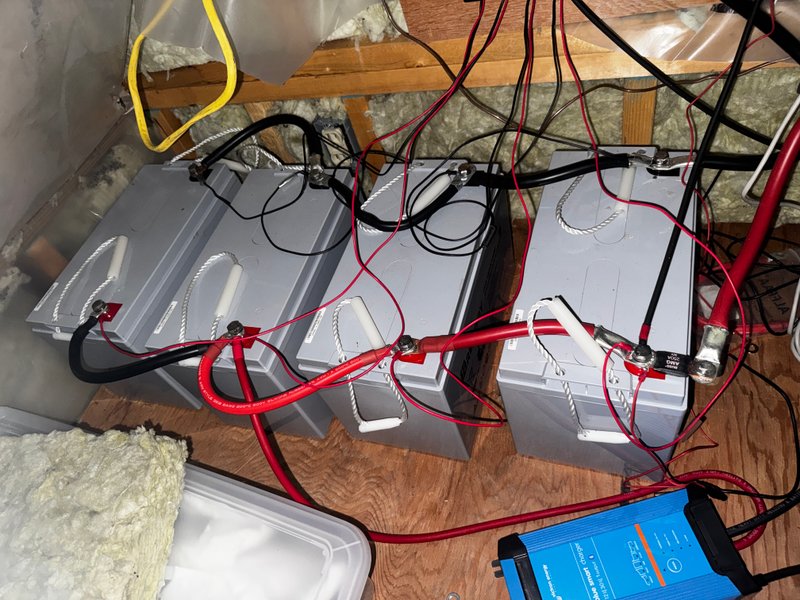
- 400Ah Renogy AGM Battery Bank (4x 100Ah 12V batteries)
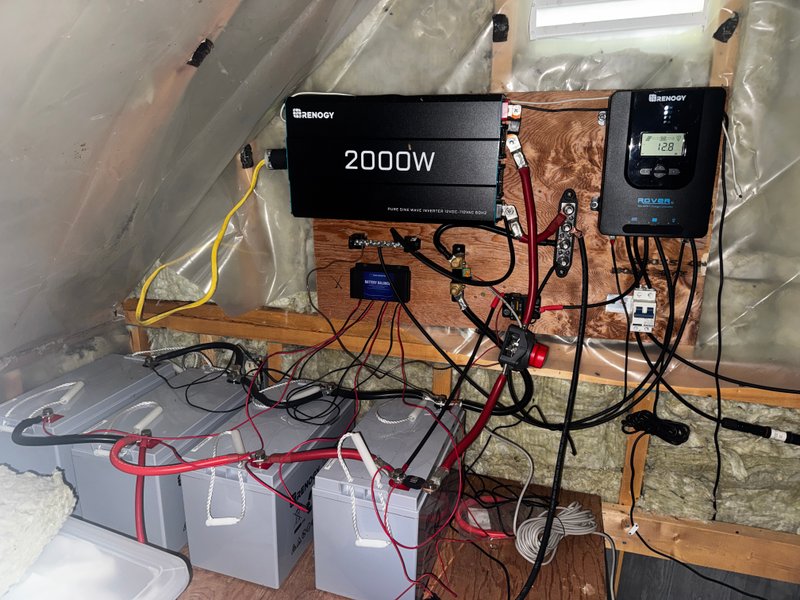
- Renogy 2000W Pure Sine Inverter (12V DC to 120V AC)
- Renogy Rover 40A MPPT Charge Controller
- 4x Renogy 100W Monocrystalline Solar Panels (expandable to 6)
- Victron Blue Smart IP22 30A AC Charger (for generator input)
- Victron BMV-712 SmartShunt (battery monitor with Bluetooth)
- ECO-WORTHY Battery Balancer (active equalization across batteries)
- Blue Sea MEGA fuses, Ampper cutoff switch, bus bars, breakers, and inline fuses
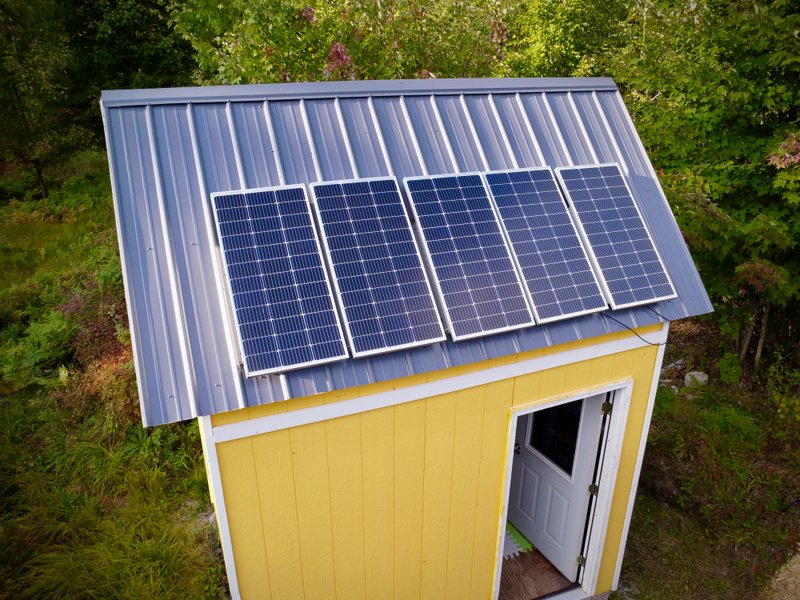
Solar Array and Mounting
Our solar panels are mounted directly to the south-facing shed roof using Renogy tilt brackets. While we currently run four 100W panels, I installed five on the roof because, at the time, I did not know that a five panel configuration does not work with the other components. Ultimately, we plan to move to a ground-mounted six-panel adjustable array for better winter performance and easier cleaning.
Lessons Learned
Even small shading from trees or ridge caps can significantly reduce output. In the summer, this roof-mount setup works well, but in winter, snow accumulation and low-angle sun make a ground-mounted system far more appealing.
Battery Bank and Cabling
The heart of the system is our 400Ah AGM battery bank. The batteries are wired in parallel with 2AWG copper cables, crimped with heavy-duty lugs and heat-shrink tubing. We used a dedicated bus bar setup with a 250A MEGA fuse protecting the main inverter leg. A manual reset breaker sits between the bus bar and the inverter, and a main disconnect switch allows us to kill DC output to the rest of the system when needed.
The bank is housed in our insulated shed, which is vented and has temperature control via a propane heater. In cold months, we’re considering adding an insulated battery box with a low-watt heat mat to maintain performance. In the summer, a window and roof vent help keep things cool.
Solar Charge Controller Setup
Our Renogy Rover 40A MPPT charge controller is wired directly to the solar array and feeds into the positive and negative bus bars. The Rover’s settings are tuned for AGM profiles, with absorption voltages set around 14.4V–14.7V and float around 13.6V. The MPPT controller dramatically improved performance over our original PWM unit that came with the two panel kit we purchaced early on in the project.
System Protection, Breakers, and Fuses
I’ve integrated fuses, breakers, and switches throughout the system to protect each major component and make testing or maintenance safe and simple. I've designed the wiring layout to allow for full isolation of each system segment.
Here’s a breakdown of the key components and protection features:
- 250A MEGA Fuse on the positive terminal of the battery bank before it connects to the Ampper Battery Cut-Off Switch. This acts as the primary fuse protecting the entire battery bank.
- 250A MEGA Fuse between the cut-off switch and the inverter’s positive terminal. This is technically redundant now, but was originally installed when we used a common positive bus bar and has remained in place as a second line of defense.
- 10A Inline Fuse on the positive lead from the solar array, providing basic overcurrent protection for the solar panel wiring before it reaches any charge control equipment.
- CHTAIXI DC Miniature Circuit Breaker installed between the solar panels and the charge controller. This breaker allows us to safely disconnect the solar input during reconfiguration or system shutdown.
- T Tocas T3 40A Surface-Mount Breaker on the output side of the charge controller, protecting the wiring and battery input circuit from the controller. This breaker also has a manual reset button, which makes it useful for rapid disconnects when testing or troubleshooting.
Battery Monitoring and Balancing
To ensure consistent performance and health across all four batteries, we use an ECO-WORTHY Battery Balancer. This device automatically balances the voltage between batteries connected in parallel. When one battery rises higher than the others (due to charging characteristics or internal resistance), the balancer redistributes charge between them to maintain equilibrium. This helps prevent long-term imbalance and early battery degradation—a common issue in multi-battery setups that aren’t actively equalized.
We monitor our entire power system with the Victron BMV-712 SmartShunt, which is installed on the negative leg of the battery bank. The shunt reads current flow in and out of the system, calculates state of charge (SOC), and gives us live performance data via Bluetooth. From the shunt, the negative cable runs into our common negative bus bar, where all components tie together—including the solar charge controller and AC charger. Grounding is handled via a dedicated common ground bus bar connected to both the inverter chassis and a copper grounding rod outside the shed.
The inverter powers our shed using a heavy-duty 12 AWG Romex® cable, wired much like a conventional house circuit. Inside the shed, we have standard AC outlets installed in the attic, at ground level, and even outside for convenience. To bring power over to the cabin—which sits across the pad—we use a heavy-duty extension cord that plugs into the inverter's outlet. The cabin itself is also wired like a traditional building, with outlets placed throughout on a single circuit: first to the computer and charging corner, then to a GFCI outlet by the shower, followed by a plug for the propane oven next to the sink, and finally a plug behind the refrigerator. We don’t use a breaker panel at this time, but the layout gives us safe, reliable access to power and keeps things modular for future upgrades.
⚡ Lightning Safety Tip for Off-Grid Solar
Even with a grounded system, it’s smart to power down during lightning storms. We recommend shutting off the inverter, disconnecting sensitive loads, and flipping any DC breakers between the solar array and your charge controller. Lightning doesn’t need a direct strike to damage electronics—a nearby hit can induce a surge through your wiring. Surge protectors, good grounding, and manual disconnects offer added peace of mind. If a storm rolls in, we’d rather be safe than sorry.
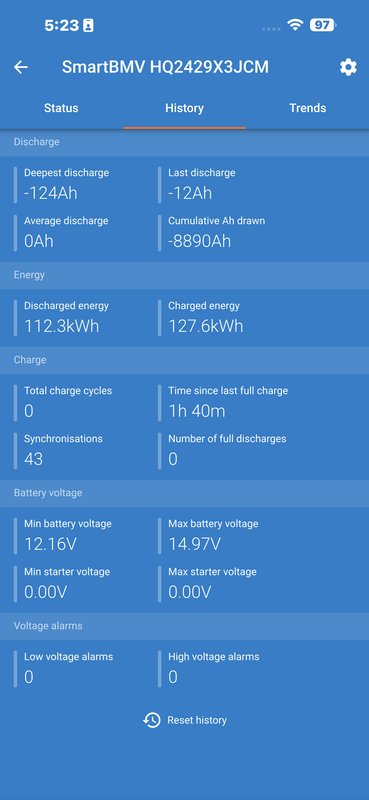
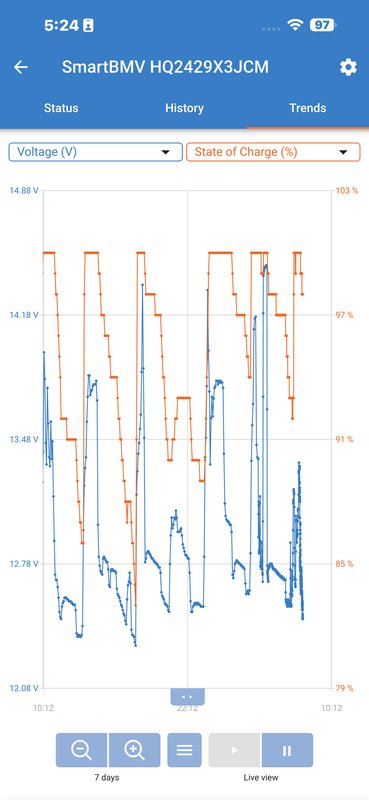
Monitoring with Victron SmartShunt
The BMV-712 SmartShunt was a game-changer for understanding our system. It shows real-time current draw, SOC (state of charge), cumulative amp-hours used, and battery voltage—all from the VictronConnect app. It also tracks deep discharge events, giving us insight into battery wear and efficiency.
Charts from the Victron app help us visualize daily trends. These let us catch phantom loads, tweak charging routines, and even plan generator runtime more precisely. The relay feature is something we’ll use in the future to automate our generator start based on low voltage or SOC thresholds.
AC Charging with Victron Blue Smart
When solar alone isn't enough—especially on overcast days—we use the Victron IP22 30A AC to DC charger. It’s inside the shed, connected to a generator input with a heavy duty extention cord. Because it’s a smart charger, it runs through bulk, absorption, and float cycles automatically. It also syncs with the SmartShunt, giving us a full picture of battery input.
Load Profile and Daily Use
Our nighttime power draw averages around 100W when the computer, monitor, and Starlink internet are all running at the same time. After a few hours, we typically shut those down, and lower-draw items like the Zevo bug trap lights (about 35W) continue running through the night. Even with everything, it’s rare for us to use more than 100Ah before the sun comes back up. Our system can comfortably handle this overnight load, especially during summer when solar input is strong the next day.
The Renogy 2000W inverter came with a wired remote power button, which we mounted at ground level inside the shed for easy access. Since the entire camp runs off this inverter, being able to shut it off without climbing into the attic is a huge convenience—and it helps us manage power intelligently. In the summer, we tend to leave the system on overnight to run our twin-nine window fan and Zevo bug traps, from mosquito season (spring) to cluster fly season (fall). Once the bugs die down and the nights get colder, we shut the system off overnight to conserve battery power. We also turn off the inverter when we leave the property, or on cloudy days when we want to ensure the battery bank gets a full charge by the time we return. These simple habits go a long way in extending battery life and keeping the system running efficiently year-round.
Future Plans
We plan to add two more solar panels to bring us up to 600W, mounted on an Eco-Worthy Dual Axis Solar Tracker System that tracks the sun. We’re also looking into automating the generator startup using Home Assistant and ESP32 hardware. And when the budget allows, we may explore a lithium upgrade to reduce weight and improve winter capacity.
Final Thoughts
This project taught us a lot—not just about solar but about system design, diagnostics, and learning through iteration. While we started with YouTube guides, we've moved into more customized setups using ChatGPT for project planning. Being able to diagnose your own system and truly understand your power needs is a big step in off-grid independence.
If you're building your own solar setup, don’t underestimate the value of solid wiring, good monitoring tools, and real-world testing. Every decision we made—from using MEGA fuses to sizing our inverter—was shaped by how we actually live, not just by specs on a box. That’s what makes it work.